RISK IN OUR AREA
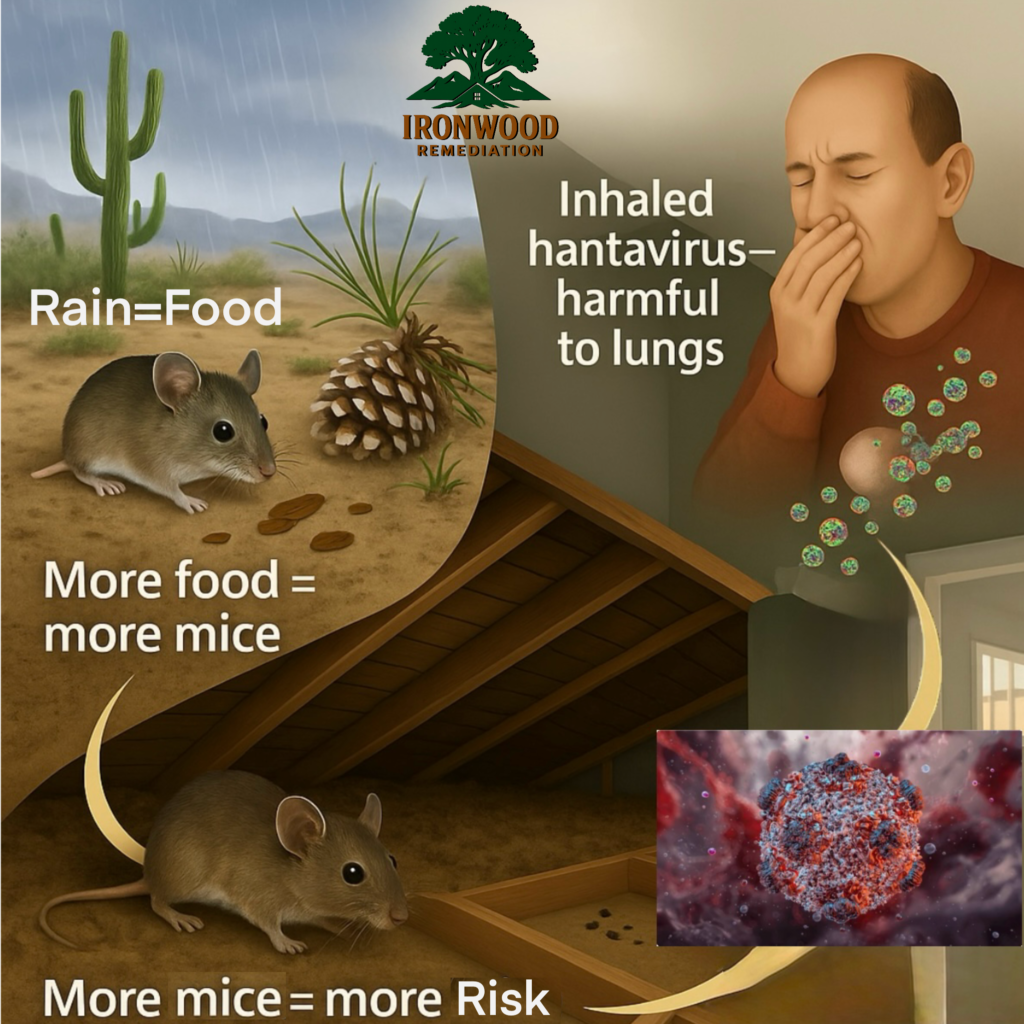
Living in Northern Arizona means living next to some of the most beautiful land in the country — forests, mountains, canyons, and the unique stretch where Arizona, Utah, Colorado, and New Mexico meet. But being this close to the Four Corners region also brings a health concern many families forget about until it’s too late:
Hantavirus — commonly known across the U.S. and many parts of the world as “Four Corners Disease.”
This virus first caught national attention right here in our region, and while cases are rare, the risk is very real — especially for homes with ongoing or past rodent activity.
Why Northern Arizona Residents Need to Stay Aware
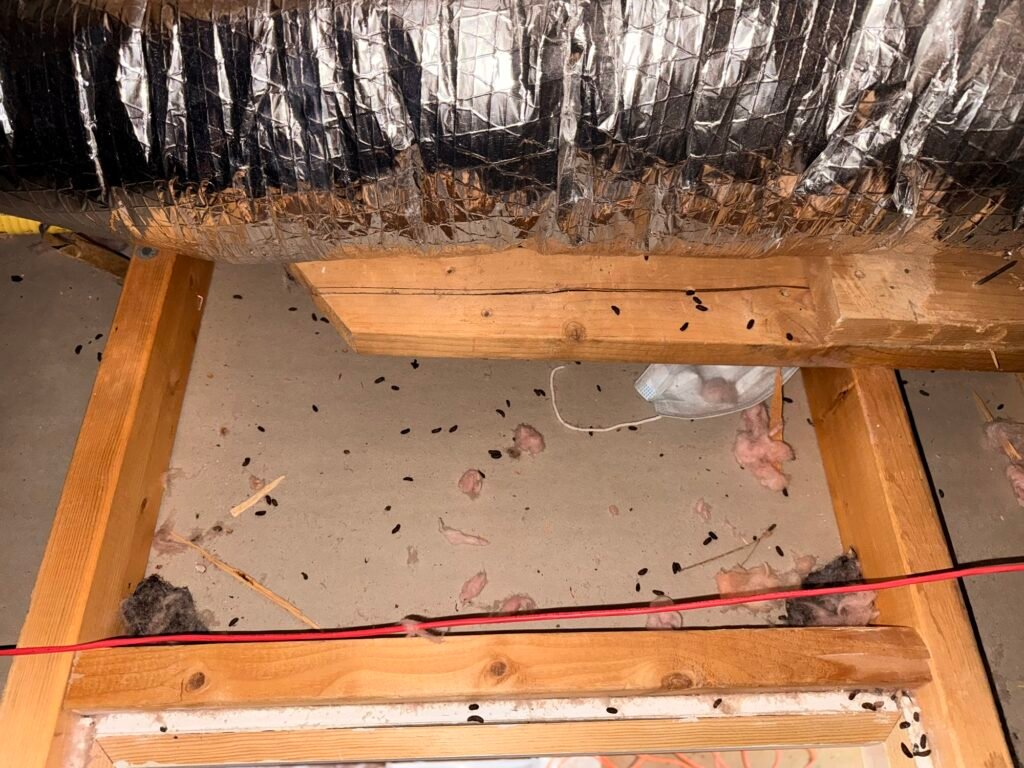
Rodents don’t just bring noise, mess, and property damage. The real danger comes from what they leave behind.
Hantavirus spreads through rodent feces, urine, nesting material, and contaminated dust.
And as everyone here knows…
rodents don’t take their feces with them.
That means even after the rodents are long gone, the attic, crawl space, garage, or storage room can still hold contaminated material that puts your family at risk. Simply sweeping, vacuuming, or disturbing insulation can aerosolize particles and create a dangerous exposure.
The Ironwood Remediation Solution
At Ironwood Remediation, our entire system is built around safe removal, decontamination, and rebuilding — not just trapping rodents. With our CR-40 & CR-61 licensed process, we focus on:
Full insulation & contaminant removal Safe Hantavirus-rated sanitation Sealing & repairing all structural openings Restoring your attic and crawl space to safe, clean condition Re-insulating with high-quality materials built for Arizona weather
We follow the same Hantavirus precautions used in professional environmental cleanup — respirators, containment, HEPA systems, and proper disposal procedures.
Protect Your Home, Protect Your Family
Northern Arizona families face unique risks that homeowners in other states never have to think about. We’re here to take those worries off your shoulders.
If you’ve noticed any signs of rodents — or if your home hasn’t been checked in years — now is the time for a full inspection.
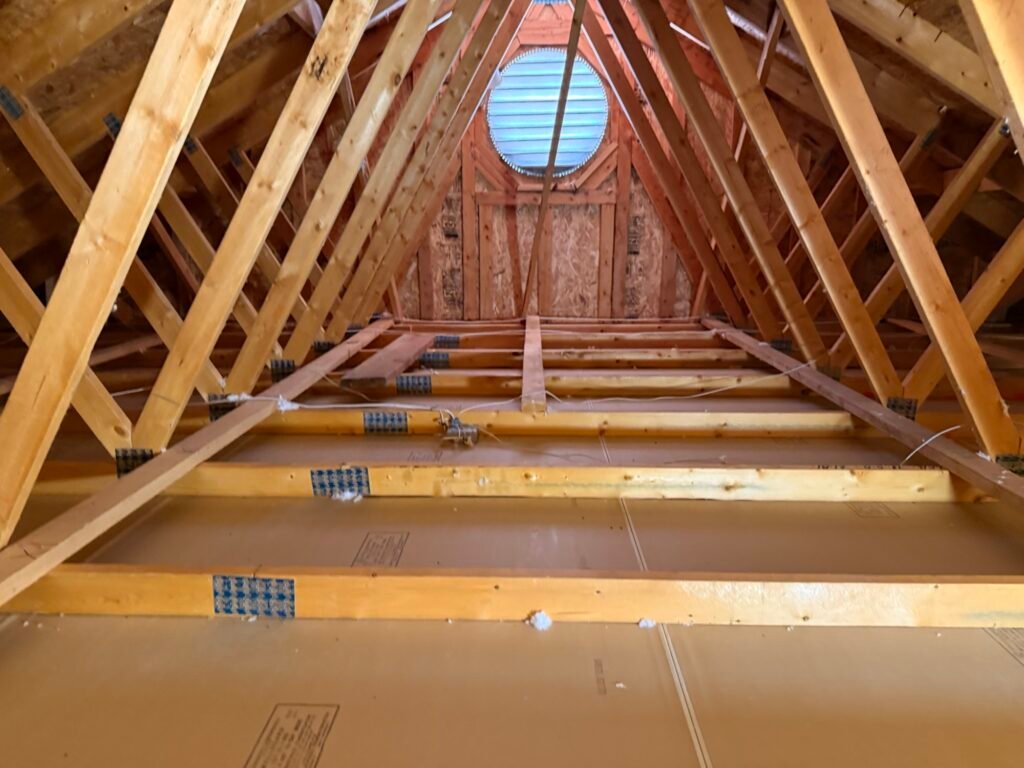
1. Initial Assessment & Documentation
Our process begins with a thorough inspection of the attic and crawl space. We identify:
- Rodent contamination (droppings, urine, nesting)
- Damaged, tunneled, or compacted insulation
- Structural issues such as chewed subfloor, torn vapor barriers, or broken vent screens
- Construction gaps and utility penetrations allowing entry
- Moisture, odor issues, or airflow restriction
- Energy loss from insufficient or missing insulation
Every issue is photographed and documented so the homeowner knows exactly what we found and why repairs are needed.
2. Safety Prep & Containment
Before work begins, we:
- Set protective floor coverings
- Wear full PPE (respirator, suits, gloves)
- Install containment barriers if needed
- Turn off HVAC equipment for safety
- Prep HEPA-rated vacuums and collection bags
This ensures contaminants stay contained and the home stays clean.
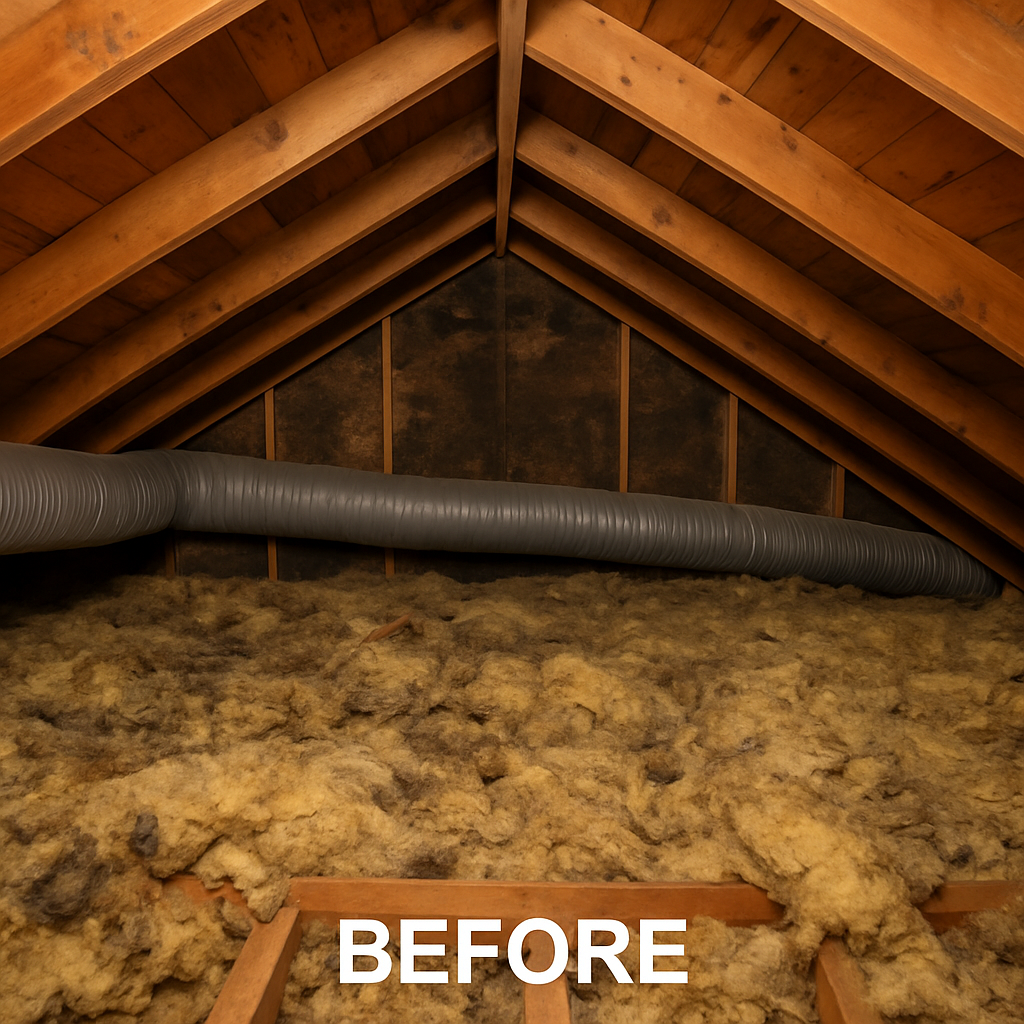
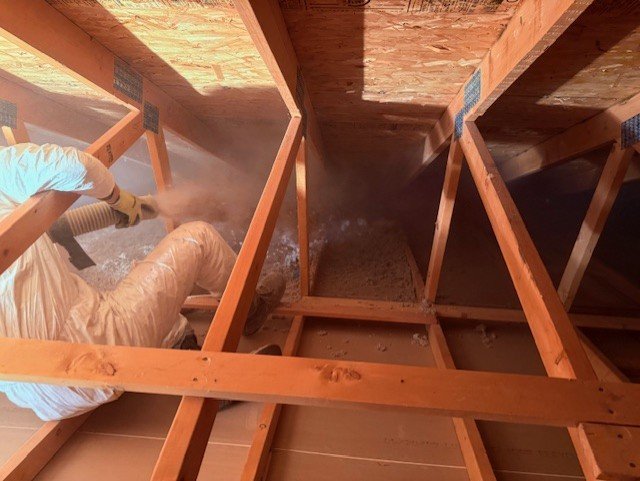
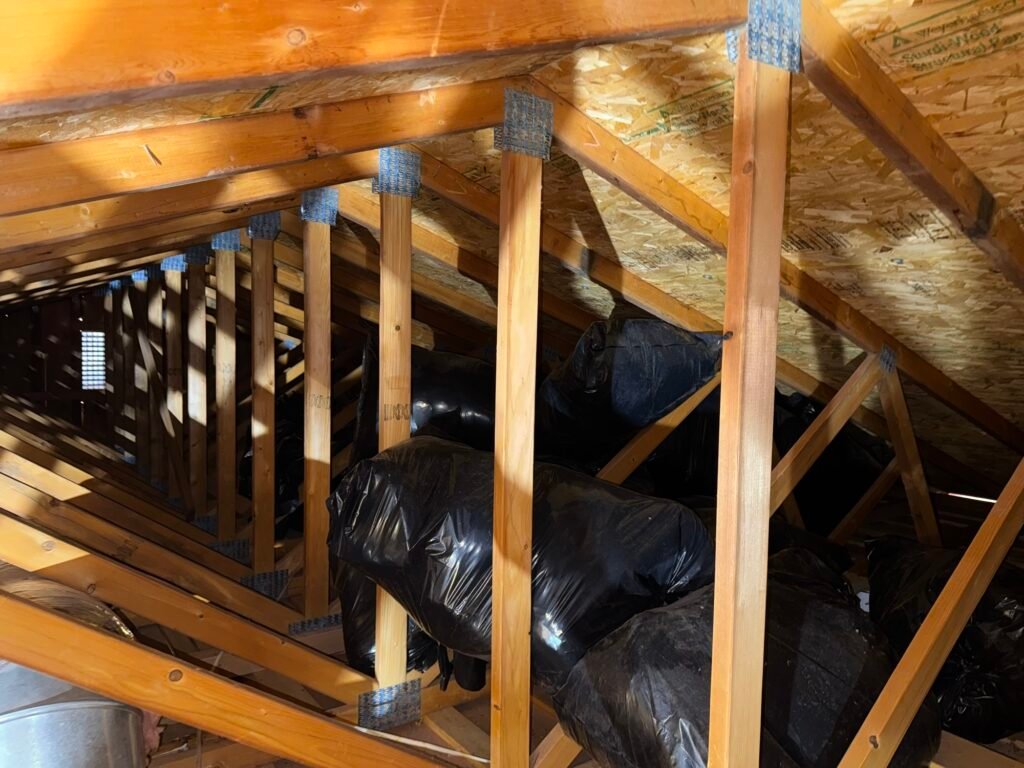
3. Insulation Removal (CR-40 Licensed Work)
We remove all contaminated insulation by hand or machine depending on attic/crawl-space conditions:
- Blown-in insulation extraction
- Removal of rodent-infested batting
- Removal of spray-foam debris if damaged
- Bagging and removal of all waste from the property
This exposes every hidden opening, damaged surface, and structural defect so we can make permanent repairs.
4. Feces, Nest & Contaminant Cleanup
With the insulation gone, we perform a full debris sweep:
- Rodent droppings and nests removed
- All contaminants vacuumed with HEPA systems
- Removal of debris, trash, shells, chewed material
- Spot cleaning of soiled wood surfaces
This step restores the structure and prepares it for sanitization.
5. Sanitization & Disinfection Treatment (CR-40)
We disinfect the entire space with EPA-approved products designed for rodent pathogens and odor-neutralization.
This includes:
- Full attic/crawl-space spray-down
- Hantavirus-rated disinfectant
- Odor removal & pheromone neutralization
- Surface sanitization of joists, subfloor, and framing
This step eliminates lingering bacteria and removes the scent trails that attract new rodents.
6. Entry-Point Sealing & Structural Repairs (CR-61 Licensed Work)
Once cleaned, we perform all structural and envelope repairs necessary to prevent future intrusion:
Typical CR-61 Repairs:
- Repair/replace damaged vent screens
- Sealing construction gaps and utility penetrations
- Rebuilding or reinforcing crawl-space access doors
- Repairing chewed insulation supports
- Subfloor patching where rodents caused damage
- Framing or fascia repairs at entry points
This ensures the remediation is permanent, not temporary.
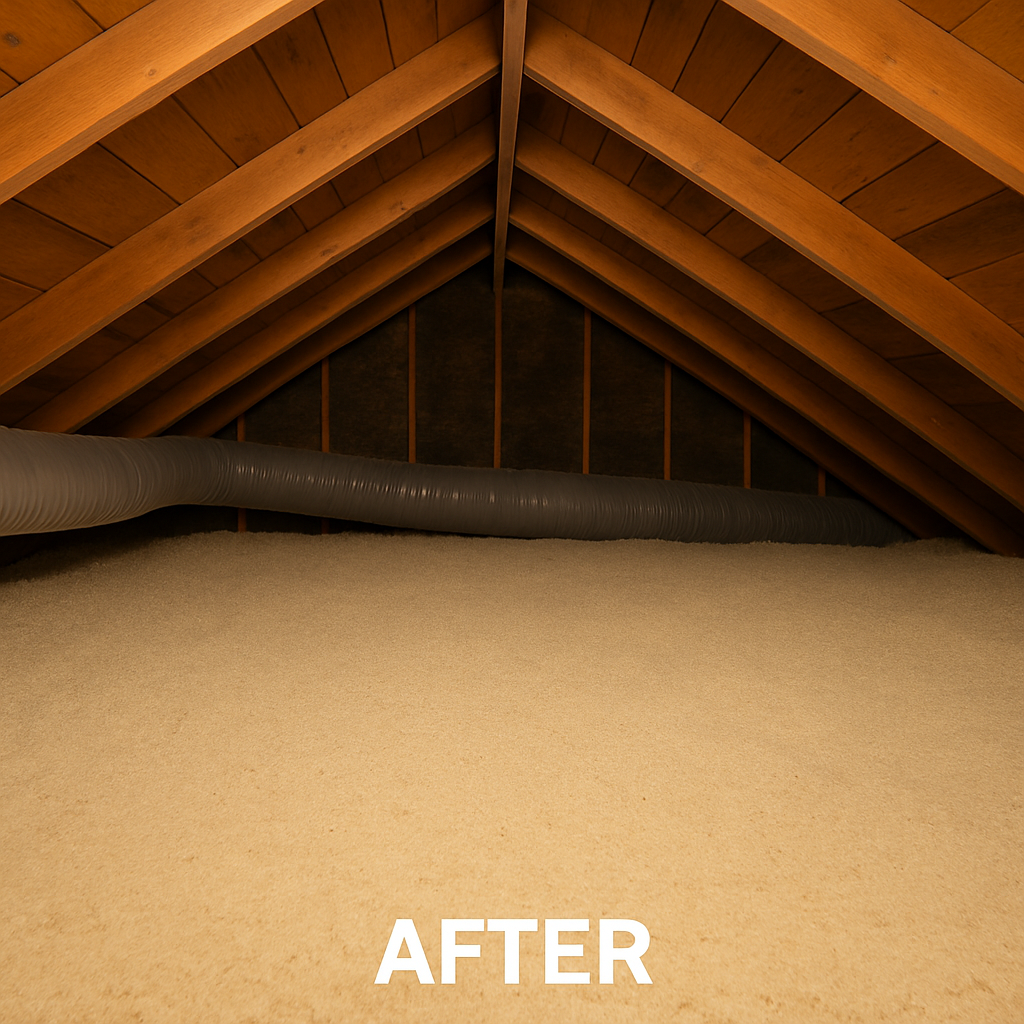
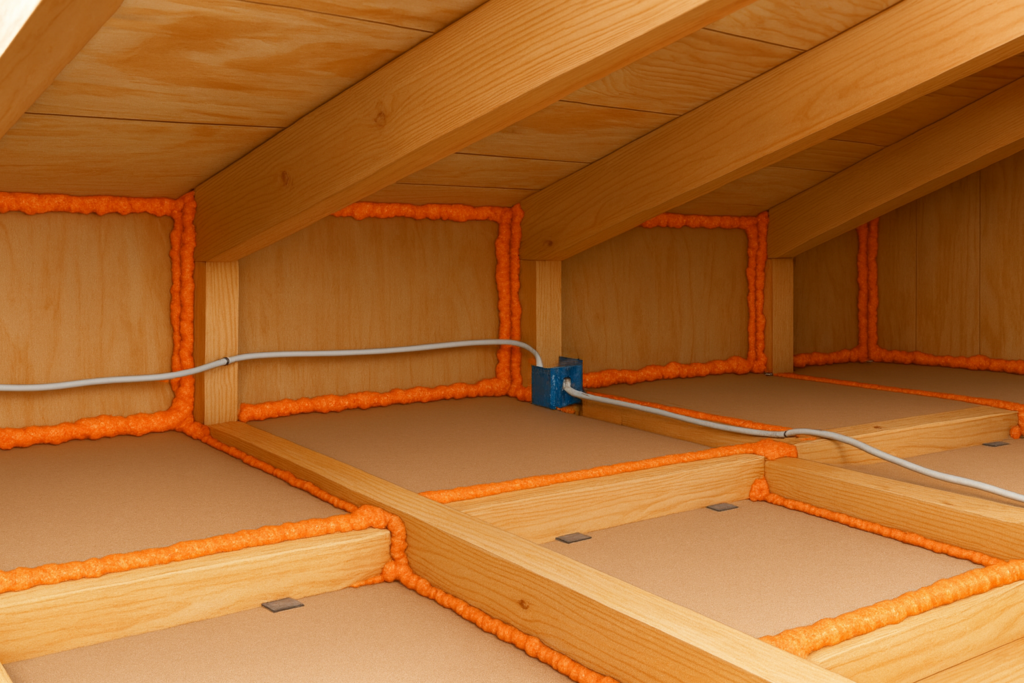
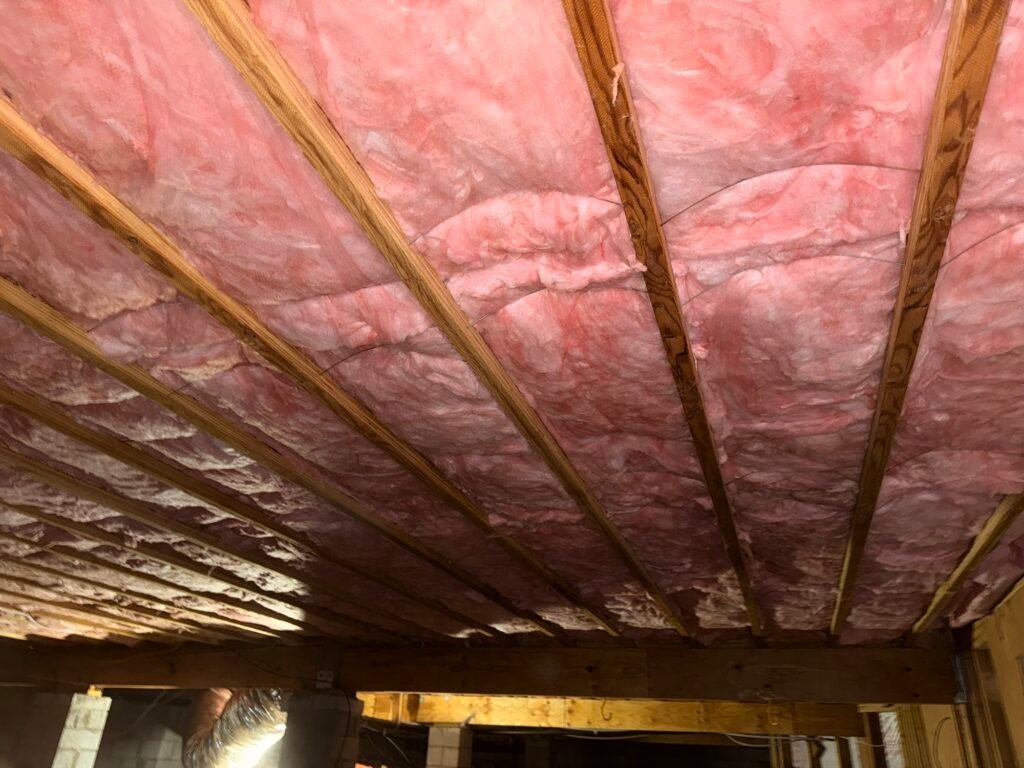
7. Installation of New, High-Quality Insulation (CR-40)
We reinstall insulation to modern standards:
- Blown-in cellulose or fiberglass (R-30 to R-60)
- New batt insulation for crawl spaces
- Airflow corrections and baffle installation if needed
- Ensuring proper depth and coverage
This improves comfort, efficiency, and long-term protection.
8. Final Quality Check & Homeowner Walkthrough
At the end of every project, we:
- Perform a full quality-control inspection
- Take final photos for the homeowner portfolio
- Walk the homeowner through all repairs
- Provide tips for future protection
- Deliver a digital before/after report for their records
Our goal is to leave the home clean, sealed, insulated, and protected — the way every Arizona home should be.

“Do it once. Do it right. The Ironwood way.”
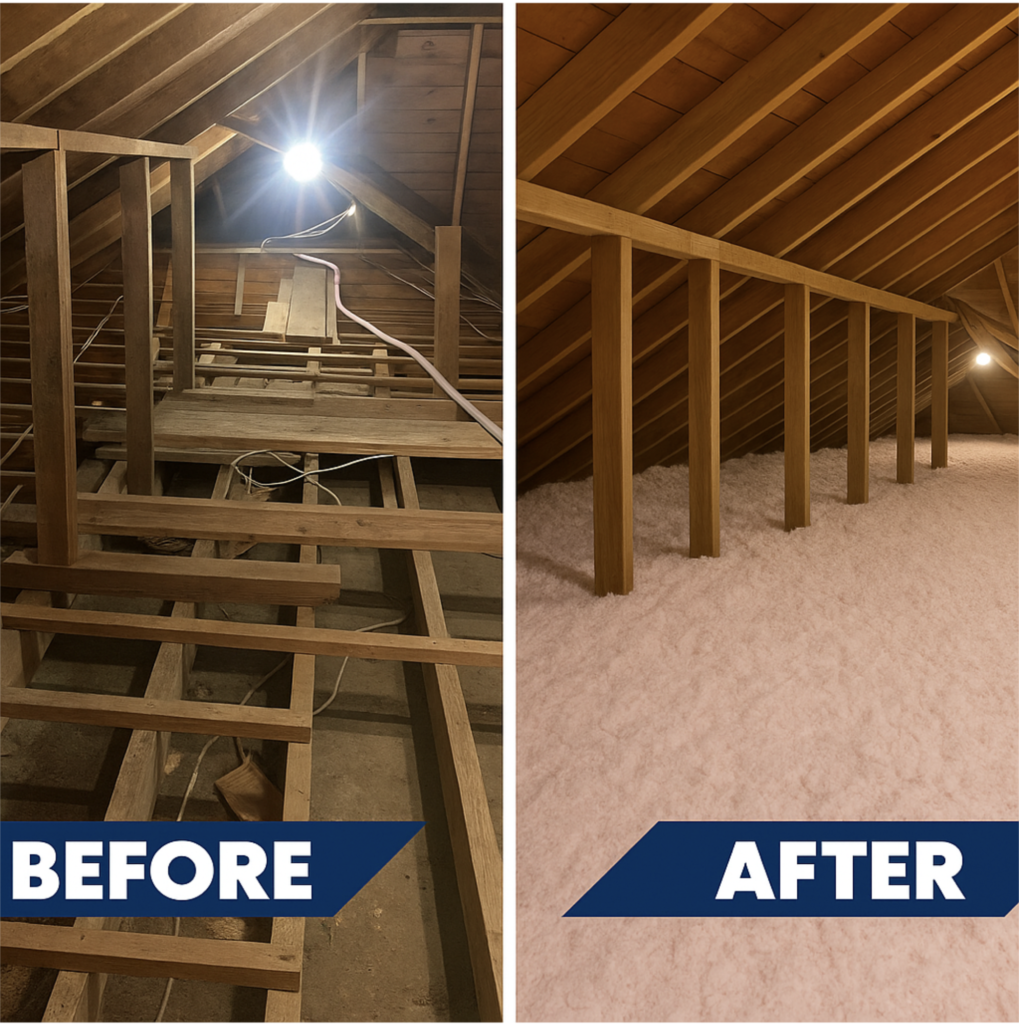
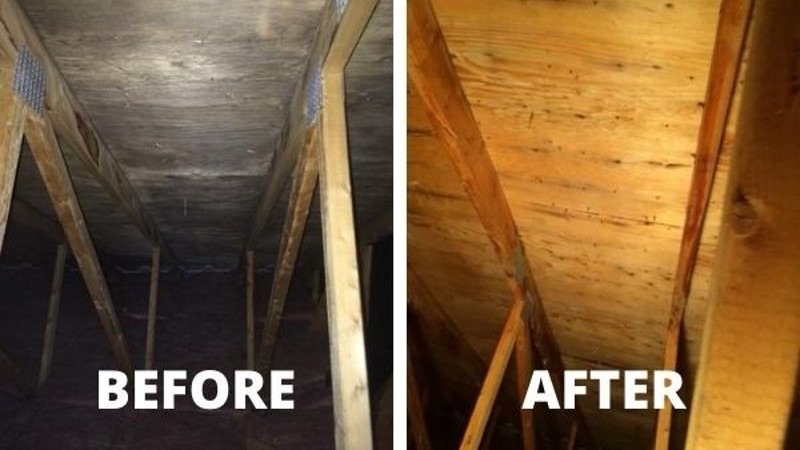
Removal & Seal
At Ironwood Remediation, insulation removal is more than clearing out old material—it’s the foundation of a clean, efficient, and protected home. By removing all contaminated insulation, debris, and rodent feces, we eliminate the pheromones, bacteria, and scent trails that attract future activity and compromise indoor air quality.
With the insulation out, every joist, subfloor, top plate, and utility line becomes visible, allowing us to locate hidden air leaks, structural gaps, moisture issues, and previous rodent pathways. We then perform a full air-sealing and closure process, sealing all visible openings and construction voids to stop heat loss, drafts, dust migration, and outside air infiltration—while also preventing rodents or wildlife from re-entering.
This combined process restores cleanliness, improves energy efficiency, and provides long-term protection by removing contaminants and sealing the home against both air leakage and pest intrusion.
“We don’t cover problems. We fix them at the source.”
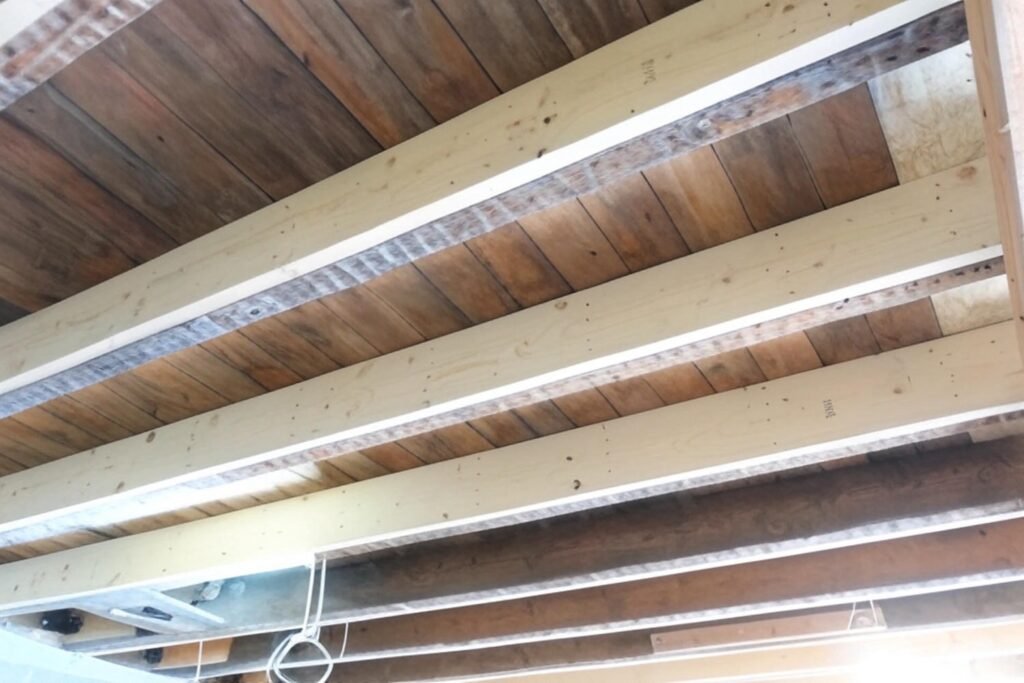
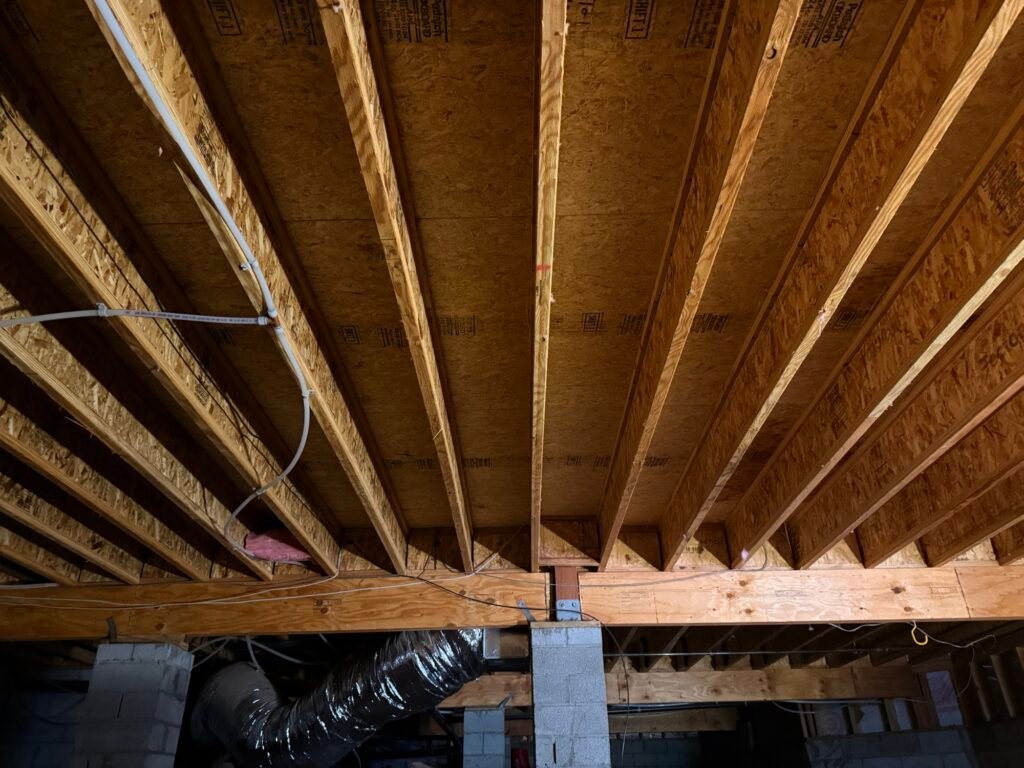
Structural Repair
We repaired damaged wood beams to restore attic integrity and ensure long-term safety for the home.
Attic structural repairs address damage or weakness in the load-bearing components of your roof system, usually discovered during inspections, after leaks, storms, heavy snow loads, or just old age. Common issues include:
• Sagging or cracked rafters
• Split or rotting ridge beams / collar ties
• Damaged or undersized ceiling joists (especially in older homes converted to storage or living space)
• Broken or improperly modified trusses
• Rotted top plates or wall studs from chronic leaks
Typical Repair Process
1. Safety & Support
Temporary shoring/posts are installed below the damaged area to support the roof while work is done.
2. Inspection & Documentation
A structural engineer or experienced contractor assesses the extent of damage and determines if simple “sistering” (adding new lumber alongside the old) is enough or if full replacement sections are needed.
3. Sistering (most common fix)
New, properly sized lumber (usually LVLs or engineered beams) is scabbed/full-length fastened alongside the weakened rafter or joist with structural screws or bolts. This doubles the strength without removing the original member.
4. Full Member Replacement
For severely rotted or cracked pieces, the damaged section is cut out and a new rafter/joist/beam is installed, often with steel plates or flitch plates for added strength.
5. Reinforcing Trusses
Trusses that have been cut or damaged are usually repaired with plywood gussets, steel plates, or scab lumber on both sides following the truss manufacturer’s repair detail (or an engineer’s spec).
6. Addressing the Cause
Fix ice dams, poor ventilation, leaks, or add collar ties/purlins if the original design is underbuilt for modern snow/wind loads.
7. Final Steps
Remove temporary supports, add blocking/bracing as needed, and re-secure insulation, wiring, or drywall below.
Our Work
“We handle the spaces no one wants to touch.”